Wednesday, March 23, 2011

i got this icebox where my [stomach] used to be.

Oh Omarion. 

I used to dance like that. In my mind. hehehe. I suppose I'll stick to baking.

As St. Patrick's Day just passed and the smell of Shamrock Shakes lingers in my car, I was itching to bake something related to this glorious Irish holiday. Now, I'm not Irish. I think the hubs is a fraction Irish? And I think I only went out once to celebrate during my college years [the city is out of control, and it's not because they dye the river green].

So why the interest, you ask? Well, the Irish are known for their indulgent adult beverage intake and strong livers. I wanted to pay tribute to this by incorporating such special ingredients. My first choice: Bailey's. It seemed natural to use it, and it played nice with my homemade whipped cream.

A couple weeks ago, I was searching icebox cakes and stumbled upon this blog. I know I've read her blog before, but not regularly. I'm not sure why not though. She's a woman after my own stomach -- she created cupcakes instead of the usual icebox cake. Following her cue, it only made sense to use the icebox wafers with my Bailey's whipped cream. They're so cute!


Bailey's Whipped Cream
(I'm sure this is out there, but this one's from my tastebuds)
Ingredients:
1 c heavy whipping cream

4 tbsp Bailey's Irish Cream (or to taste)
1/3 c powdered sugar (or to taste)

Directions:

Mix heavy whipping cream on medium-high until soft peaks form. Add Bailey's and sugar. Whip until well incorporated and cream is more firm.

I think the sugar enhanced the Bailey's flavor...this could very well just be in my head. I actually started with just the Bailey's, and then added the sugar after I wasn't getting the taste I was looking for. I might have added a little bit more than 1/3 cup of sugar too...but it was definitely less than a 1/2 cup! So that's not too bad, right?


And since I was already in the supermarket aisle seeking out the Bailey's, I figured that I might as well grab some Guinness. Even though I don't drink the stuff (or its wheat/barley counterparts), I knew of recipes that called for it. Over the past years that I've spent blog-stalking, these recipes had always intrigued me, so I caved and threw some in my cart. How convenient it was for the morning news to do a segment on Irish dishes the day after my purchase.

If you scroll down on that page, the recipe for the Guinness cake is there, and I used it to a 't'. Except!! I made cupcakes. Of course I made cupcakes instead, silly! I baked these with cupcake liners at 350 degrees Fahrenheit for 17-18 minutes or until a toothpick comes out clean.


Bailey's Cream Cheese Frosting
adapted from Wayne's Weekend
Ingredients:
8 oz. cream cheese, softened
4 tbs. butter, softened
1/2 tsp. cinnamon
1-1/3 c. powdered sugar
1/4 c. heavy whipping cream
1/4 c. Bailey's (or to taste)

Directions:
Cream together the cream cheese and butter. Add cinnamon. Slowly incorporate powdered sugar, alternating cream and Bailey's to get a stiffer, but spreadable frosting (the Bailey's will quickly make the frosting very runny, so be careful!). 


I could definitely get used to Guinness in cupcake form. This was such a good cake! I'm mostly surprised because of said beverage. Who knew barley and hops could taste so yummy? I thought the frosting was a nice balance for the cake. My oldest sister sent me a different link to a similar recipe, but that one included a Bailey's chocolate ganache. I thought about incorporating it into my cupcake, but I didn't have the time. Perhaps next year...and I'll work on having them ON the actual day. 

You'll see that I have an abundance of ideas; I just have a hard time executing them 'on time'...or at least blogging about them on time. I'm working on my timeliness. Honest. In the meantime, you can search through my labels ;) The least I can do is be organized for you!

Happy St. Patrick's Day Wednesday!


Wednesday, March 9, 2011

my belated valentine post.

One of my guilty pleasures: the prepackaged sugar cookies with cake frosting and sprinkles that you can get at the supermarket. They're convenient when I don't have time to bake and I want cookies right then and there. But I know I should stick to baking them on my own. I've made my fair share of sugar cookies, but usually I make them with royal icing, like these. However, since I had about 20 valentines this past February 14th, I wanted to do something a little more special. And after seeing my aforementioned guilty pleasures at the store, I had the perfect idea.

I'm sure most of you remember having classroom valentines in grade school and getting the conversation hearts in your milk carton mailbox. I remember loving the sayings, but not caring too much for the actual candy.  But these, I would gladly welcome these in my milk carton mailbox. [Or my hot pink mailbox from a superstore's dollar section.]


With music being one of my first loves, I couldn't help but choose some of my favorite songs and use them for my cookie sayings. Naturally, they would be called "song-versation" hearts, right? ;) And when I brought them in to my students, some of the titles sparked some conversation, such as, Student: "What does emm-fey-oh mean?" Me: "Do you mean MFEO?" or Student: "What's P.Y.T.? Is that like 'peace to you'? I think you did it wrong." hahaha...these kids crack me up!


The kiddies thoroughly enjoyed the cookies -- and one of the teachers I work with promptly told me that I spoil them. True story. I love baking for my students, and since I have the time, I might as well, right? Plus, they think I'm extra-amazing because I bake...hehehe.

I made everything from scratch, but I know this can be a daunting task for some. Wanna make these too?

quick version of songversation hearts

You'll need:
Sugar cookie mix -- prepared to make cut-out cookies
Heart shaped cookie cutters
Vanilla frosting
Food coloring (to make pink, red, light purple, yellow, green)
Small spatula

Directions:
Make cookies according to package directions. While baking, begin preparing the frosting. Use food coloring to make your desired colors. I began with vanilla (white frosting). Take about a spoonful of frosting and place on the cookie. Using your small spatula, spread out the frosting evenly to the edge of your cookie. Take the side of your spatula (perpendicular to the cookie) and run it around the edge to clean up the sides of your cookie. 

After frosting a few cookies with white frosting, divide the remainder into two bowls: one bowl should have twice the frosting than the other. The bowl with more frosting will start with a couple drops of red coloring to make a light pink.  Frost a few cookies. Add a little blue coloring to make a light purple. Frost a few cookies. For the remainder of the light purple frosting, add more red coloring until the frosting is red (if you let this sit for a few hours or overnight, the red will be more pronounced). Transfer the red frosting into a pastry bag that is fitted with a writing tip (this is to write on the cookies). Alternatively, you could buy a red frosting cookie writer as it may be a simpler option. 

With the second bowl of white frosting, start with a couple drops of yellow coloring to make a light yellow. Frost a few cookies. Add a little blue coloring to make a light green. After all of your cookies are frosted, use the red frosting to write your message.

Another true story: I love this new plate that I bought. love and songversation cookie hearts. Sounds like a perfectly complete valentine to me.


And as a belated celebration, my niece and nephew came over, and I sent them home with valentines of their own. As the trade off, they snapped a couple pictures for me -- this was the best shot I could get where they weren't laughing their heads off. They may be grown now, but it's like they're still little! :D I love them to pieces! <3


P.S. Don't fret friends...The hubs, my numero uno valentine, received the first of the cookies, with song titles for him too. My fave? MLWSW You [My Life Would Suck Without You...hehehe]

Sunday, March 6, 2011

project!


I have been pondering about this project for a couple years now: how to send a decorated cupcake in the mail. Initially, I was thinking: "I'll just send the cupcake and frosting separately." But then I decided that wasn't as special. One blogger got it down, but that required more work and worry than I wanted.

Other bloggers would bake the cupcakes, cut them up, and put them in the glass jars and layer the frosting. I preferred the idea of baking the cakes in the jar and frosting them as I would a normal cupcake. I couldn't find the jar size I was initially thinking of, but these worked just as well for my first trial.

A friend of the hubs and mine recently bought a new place (Hi Ben!). Now he's been on the search for quite some time. And finally, he found his perfect "sweet home", and I vowed to myself that he would get the first mailed cupcake jars. What better way is there to celebrate your new home?


It took me a while to actually get these baked up and shipped out. I gave him two frosting options; his choice: clearly Oreo. Naturally, I had to dress up the jars, so I took my cue from canners -- grabbed some pretty fabric that I had on hand and some matching ribbon and finished off the jars. I shipped the cupcake jars from frozen and two days later, they were received as a success! I contemplated overnighting them, but again, it was a trial. If they arrived bad, I was surely going to replace them :) and of course, re-think my strategy.

Ben was kind enough to post a couple of photos for me, and aside from the flattened frosting, they were perfect! He was excited for the package waiting for him when he got home, and he told me they were wonderful. I love me some satisfied customers!


Tuesday, March 1, 2011

i'm just here for the food.

Cinderella and football: they go together, right? I love the story of Cinderella. One of my favorite versions? 'Ever After' with Drew Barrymore. Remember the part where the step-sister was like, "Of course not mother. I'm only here for the food." That's who I am when it comes to sports.

Now I know that 2011 Superbowl XLV has come and gone, but I can't help but post about my treats [Again, I'm still catching up on my posts]. First thing's first. I don't follow football. I enjoy watching college games every now and again, and I definitely enjoy tailgating and parties. But I don't know much about the actual game. My hubs knows a lot of facts and rules and such, but he doesn't follow either.

To you sports fans out there, it will come as a disappointment to you that I am a bit of a bandwagon sports fan. It's just not exciting for me unless I know it's high stakes or something of the sort. So I only watched the last couple Bears' games, including their loss to the Packers. No Superbowl for Chicago. Oh well.

Every year, we get invited to a couple Superbowl parties; this year we ended up going to my sister-in-law's. They were rooting for the Steelers. I was rooting for the food. Going to my sister-in-law's (shout out to Anne!), there's never a shortage of good grub. The hubs and I weren't staying for the whole game -- long drive and work in the morning peeps -- we literally were going for the food...and the company of course!

Since we were going to arrive a little earlier, I figured a pre-game snack would be perf. Everybody loves the standard salty Chex mix party mix, or even puppy chow/muddy buddies, but I was feeling a bit crazy and decided on a sweet and salty mix. I saw a Christmas version with Santa hats, and I knew team megaphones would work out great. I made it all the night before, threw it in a huge bowl, and took it to the party, where it was enjoyed by most [not everyone can handle the sweet and salty together...it's a serious combination].


Sweet n Salty Party Mix
adapted from cookies and cups
Ingredients:
3 cups mini pretzels (I used 4)
1/2 cup craisins (I used 3/4 cup dried cranberries)
2 cups Rice Chex (I used 3)
(I added about 1 cup of plain bugles, on top of the 1 cup of 'megaphone' covered bugles) 1 cup salted dry roasted peanuts (I used 1 cup cinnamon almonds)
2 cups holiday colored m&m's (I didn't measure, just picked out team colors from the large bag)
8 oz. white chocolate for melting

Directions:
Spread all of your ingredients, EXCEPT cinnamon almonds, m&m's and megaphone Bugles, out on a baking sheet lined with parchment or wax paper. Melt the white chocolate according to the package directions and drizzle over the mix. Transfer into a large bowl and gently stir to coat the mix with chocolate. Return mix to the baking sheet to allow chocolate to set and dry. Add the 'megaphone' covered bugles after this.

For Megaphone Bugles:
Bugles
Colored candy melts
Toothpicks
Choose about 1 cup of "well-shaped" (not too curved, etc.) Bugles. Melt candy melts according the package directions. Dip each Bugle using a fork and toothpick in order to let the excess candy melts to drip off. Place on a baking sheet lined with wax paper. Repeat until all Bugles are coated. After they have set and dried, using another candy melt color, use a toothpick to write/draw the team's logo. You could probably use a pastry bag/triangle, but I prefer the control of the toothpick.

And since I had some blue candy melts on hand, I couldn't help but give a shout out to Chicago.

Like I said, I'm here for the food. 
And so is she. ;)

Sunday, February 27, 2011

snow day sweets


 Above: About an hour an a half into the storm; Top: Our front door the morning after; Bottom: The afternoon after, view from our 2nd story window

So you might have heard of a small blizzard that recently hit the Midwest...namely, Chicago and its surrounding suburbs. Living and working in said 'burbs often prompts the occasional 'snow day' during the winter months. Even the Chicago Public Schools got a snow day...and that never happens.

Naturally, on said snow days, people look to activities that can be enjoyed indoors (or activities that require freshly fallen snow -- however, even the ski hills were closed!). For the hubs, the best activity would be playing video games. For me, that would be baking. So I awoke that blissful morning and examined my pantry.

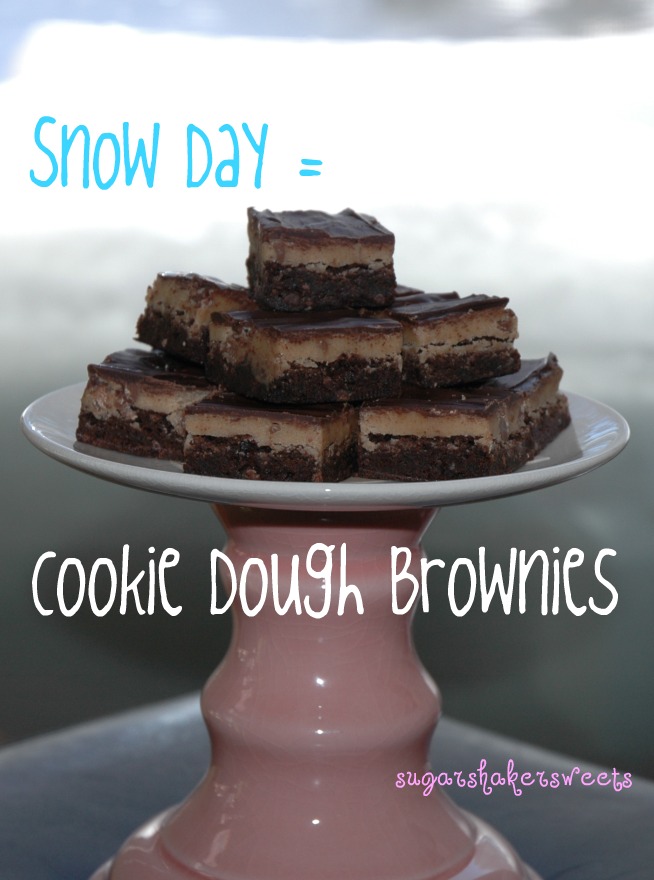
I was thinking brownies, but then I was craving cookies, and then I thought, I swear I've seen these together before, like a "brownkie" if you will. So I did some googling, and found a few recipes. Finally I decided a brownie base with some cookie dough was what I wanted.
As the snow began to slow, my oven was preheating, and I prepared the following:


Brownkie Dough
adapted from several sources

Ingredients
For Brownie Base:
1 cup butter
3/4 cup unsweetened cocoa powder
1-3/4 cups granulated sugar
1/2 teaspoon salt
2 eggs
1 teaspoon vanilla extract
1-1/4 cup all-purpose flour
1/2 teaspoon baking powder

Cover baking pan with foil. [I used a 12x17 inch jelly roll pan as I wanted to make thinner brownies and have more pieces.] Spray with cooking spray. Preheat oven to 350F.

Melt 2 sticks of butter in a medium saucepan; add cocoa, stirring until smooth. Remove from heat and let cool. Transfer to mixing bowl. Add sugar, salt, eggs, and vanilla. Beat slowly until combined. Add flour and baking powder. Mix well. Spread batter into pan. Bake for 25 minutes. Allow brownies to cool completely before layering the cookie dough.

For Cookie Dough:
1 cup butter, softened
1 cup light brown sugar, packed
1/2 cup granulated sugar
4 tablespoons milk
2 teaspoons vanilla
1-1/2 cups all-purpose flour
1/2 cup malted milk powder or crushed Whoppers
1 cup milk chocolate chips

In a mixing bowl, combine butter, sugars, milk and vanilla. Beat until combined. Add flour and malted milk powder until incorporated. Fold in chocolate chips. Spread evenly over cooled brownie layer.

For Hard Chocolate Topping:
1 cup semi-sweet chocolate chips
1 tablespoon shortening

Melt together and stir until smooth. Spread evenly over cookie dough layer.


I wanted to cut these into cute little shapes, but the brownies were a little deeper than my cookie cutters. I let the brownies harden in my outdoor fridge/freezer, a.k.a. my garage in the winter; this way they're a little easier to cut. I packaged these babies up and brought them in as a treat for my students when we came back after the blizzard.

Although they were bummed that we didn't get a five-day weekend, like other schools in the area, they were very happy to get the sweets. These had a perfect balance of brownie and cookie dough. I must admit I kept the edges for myself, and then packaged some up for my family too. Goodies for all! Gotta love snow days ;)


Friday, February 18, 2011

whoop whoop whoop!

[throws right arm in the air and proceeds to move it in a circular motion, arsenio hall style]

To say that I was 'making whoopie' is just too expected. Love the pun, though.


I've had this whoopie pie recipe bookmarked for a while now. A couple years ago, they were quite popular on the blogs that I frequented, so after seeing it again, finally I was like, "Hey, I should try those one day!" I might add that I never had a whoopie pie either. They just looked yummy. I mean, I love my cupcakes, so why wouldn't I love a whoopie pie? Two cake-like cookies with fluffy filling in-between -- yes, please! hehehe

So I'm not teaching this year. I suppose that's fine...at least I'm working, right? I do, however, work directly with a handful of teachers. I could count them on one hand. It's not what I'm used to, but again, that's fine. The kids are great, and that's important. :) 

One of the teachers that I work with especially loves the peanut butter and chocolate combination. Being the baker that I am, I want to make things that people will love. So for her birthday a couple months ago, I made some peanut butter delights. She loved them. I mean, who in their right mind wouldn't? And then, a few weeks ago, she tells me that her student made something and that it rivals my peanut butter delights. Wow. Those are some choice words, lady. So in the quick glance of what she showed me, I realized it was this. I mean, how can I compete with creamy, chocolatey, peanut buttery goodness?

Enter: the whoopie pie. I don't take her to be a cupcake girl, such as myself, but I thought the whoopie pie would suffice. Now, she didn't mean to prompt a competition, but really? I don't need to win, but I figured, who wouldn't want some whoopie?  

left: peanut butter whoopie pie with peanut butter chips; right: nutella whoopie pie
Classic Chocolate Whoopie
from Whoopie Pies (I think I may have to purchase this book now!)
Ingredients:

1 2/3 cups all-purpose flour
2/3 cup unsweetened cocoa powder
1 1/2 teaspoons baking soda
1/2 teaspoon salt
4 tablespoons unsalted butter, softened
4 tablespoons vegetable shortening
1 cup packed dark brown sugar
1 egg
1 teaspoon vanilla
1 cup milk

Directions:
Preheat oven to 375 degrees. Line baking sheets with parchment paper. In a medium bowl, sift together, flour, cocoa, baking soda, and salt. Set aside. In a mixing bowl, beat butter, shortening and sugar with a mixer on low until combined. Increase the speed to medium and beat for about 3 minutes. Add egg and vanilla and beat for two more minutes. Add half of the flour mixture and half of the milk and beat on low until incorporated. Repeat with remaining flour and milk and beat until combined. Using a tablespoon (I used a 1-inch cookie scoop, but then decided piping it was easier), drop batter on baking sheet two inches apart. Bake for about 10 minutes each or until pies spring back when pressed gently. Remove from oven and cool for about five minutes before transferring them to a rack to cool completely.
    1 Tbsp of batter should make about 48 two-inch cakes or 24 pies.
    2 Tbsp of batter should make about 30 four-inch cakes or 15 pies.
    (I probably used 1-1/2 tbsp since I made about 20 pies)

    Salty Peanut Butter Filling
    adapted from Whoopie Pies
    (I ran out of pb)
    3/4 cup creamy peanut butter (or crunchy) [ I used 1/2 cup]
    3/4 cup unsalted butter, softened [I used 1/2 cup]
    3/4 cup confectioners sugar [I used 1/2 cup]
    1/2 teaspoon salt [I used slightly rounded 1/4 teaspoon]

    In a mixing bowl, beat peanut butter and butter together on low until creamy. Add sugar and salt and beat on low until incorporated. Increase speed to medium and beat for about four minutes until the filling is light and fluffy. Spoon or pipe filling on flat side of one cooled cake. Top it with a second cake and press gently. *Use peanut butter chips on the sides of the filling -- adds a great texture and more peanut buttery flavor*

    Based on the filling recipe above, I also made a Nutella filling (which could very well be in the book and I just don't know yet!)
    1/2 cup Nutella, rounded
    1/2 cup unsalted butter, softened
    1/2 cup confectioners suger
    1/4 teaspoon salt
      Store whoopie pies in an airtight container.
      ***
      I loved these!! I packaged some up for the aforementioned teacher, as well as another teacher that I work with. Such a nice treat during finals (so sue me, I'm about a month behind on my blogging).

      They're a great alternative to cupcakes, especially when packing them for lunch ;) Then you don't have to worry about the frosting getting messed up, since it's sandwiched between the cakes. Yah, I definitely think I'm gonna order this book. Update: I just received the book from Amazon -- more whoopie is in my future.

      Friday, January 7, 2011

      sticky holidays and happy buns.


      The hustle and bustle of the holidays are finally over. And if your holidays were anything like mine, the only time you had to sit down was to either a.) wrap presents, b.) put on your socks/shoes, c.) go to the bathroom, d.) travel somewhere in the car or e.) eat a meal with family/friends (though I'm sure some of you were still too busy to even do this!). Although I must admit that I put the "busyness" upon myself. :) Anyway. Back to my actual topic at hand...

      Being on break from school, naturally I spend most of my time in the kitchen. And most of that time is spent baking. With lots of sugar. Now one thing I should add is: the hubs is diabetic. Has been since I've known him. And for almost ten years before that. Some might say that it's ironic that I'm married to a diabetic because I love baking. With lots of sugar. So I should add that he rarely eats anything that comes out of my oven. Unless it's chicken. And I've yet to make a chicken cupcake. The thought weirds me out a little.

      Anyhoot. The hubs and I have been together for ten years. Married for three and a half. Some of you may think, 'pish posh, that's nothing!' But still, it's a good amount of time. However, within those ten years, we haven't been able to continue any holiday traditions that we've attempted to establish.

      The first few years that we were dating, we would watch the specially IMAX-released Disney movie on New Year's Day. Then they stopped releasing them. They all get released on blu-ray now. No one cares to see a previously viewed Disney movie in the theater these days. As for other traditions, of course we've got the family dinners here and there, but no real traditions to call our own.

      SO! Holiday traditions. And baking for a diabetic.

      The only thing that makes sense here would be sticky buns on Christmas morning. Of course! This sounds like a fantastic idea! Unless you're up until 2 a.m. (technically on Christmas morning), wrapping gifts and finishing the chocolate chip date cookies you swear your sisters will love. The problem with planning on making sticky buns in the morning is waking up with only an hour before Christmas mass starts. Then we have to pack up the car, pick up my nephew, and head over to my sister's (a couple hours away) for Christmas dinner.

      No Christmas morning sticky bun tradition for us.The day after the day after the day after Christmas morning sticky buns just doesn't have the same ring to it. Ah, perhaps I'll plan better next year.

      We finally had a sliver of a lull in our plans, and decided to have the sticky buns then. I prepped the buns and sauce and found a good, warm place for the buns to rise. Naturally that would be on top of our washing machine in the same room where the furnace is. So we waited. And waited. Until the buns finally rose. And they finally did. And twenty minutes later, we had these:

      a perfectly delicious, diabetic-friendly sticky bun tradition. (though I'll work on the tradition part.)

      Caramel-Pecan Walnut Sticky Buns 
      (adapted from splenda.com)
       Ingredients:
           Rolls:
      1 cup water
      1/2 cup butter
      1 envelope active dry yeast
      1/2 cup warm water
      2 large eggs
      1/4cup Splenda Sugar Blend (I used 1/4 c. of regular Splenda minus 1-1/2 tbs, 1-1/2 tbs sugar)
      1-1/4 tsp (I used kosher) salt
      5 cups all-purpose flour (I used 4 cups a.p. flour, 1 cup whole wheat a.p. flour)
      1 cup chopped pecans (I used walnuts)
      1/4 butter, melted
      1 cup Splenda Brown Sugar Blend
      1 tsp ground cinnamon (I used 1-1/2 tsp China Tung Hing Cinnamon)
           Caramel Sauce:
      1/3 cup butter
      3 tbs 2% reduced-fat milk (I used 1%)
      2 tbs light corn syrup
      3/4 cup Splenda Brown Sugar Blend

      Directions: Bring water to a boil in a saucepan, remove from heat and add butter. Stir until butter melts. Let cool about 20 minutes. Combine yeast and warm water in a glass measuring cup. Let sit about 5 minutes. Beat eggs in a large mixing bowl; add Splenda and salt until combined. Add yeast mixture and butter mixture; beat on low until blended. Gradually add flour; mix until combined. Turn dough out onto a floured surface and knead until smooth. Place in a well-greased bowl (I used vegetable oil), turning to grease top. Cover and chill dough for 8-72 hours
      .
      Note: Splenda's directions tell you to make the caramel sauce and pour into pans, then prepare the buns. I think my sauce sat too long and made them more 'chewy' than 'sticky'. So when I make these again, I will prepare the buns and then make the sauce. I'll make note if there is a difference. :)

      Prepare caramel sauce: Combine butter, milk, corn syrup, and Splenda Brown Sugar Blend in a small saucepan. Cook over low heat. Stir constantly until blend dissolves. Bring mixture to a boil over medium-high heat. Boil for 1 minute. Immediately pour sauce into 3 lightly greased 8-inch cake pans. Sprinkle 1/3 cup walnuts/pecans in each pan.

      Punch down dough and divide into 3 equal parts. Roll one part into a 12x10 inch rectangle. Brush with melted butter. Combine Splenda Brown Sugar Blend and cinnamon. Sprinkle 1/3 cup over each rectangle. Roll up dough starting on the long side and pinch edges to seal. Cut into 9 pieces and arrange on caramel sauce (I left about an inch between each piece to leave room for the dough to rise and bake). Repeat with remaining dough. Cover and let rise in a warm place about 30 minutes or until doubled in size. Preheat oven to 375 degrees F. Bake for 20 minutes. Cool for 5 minutes. Invert onto serving plate.


      Devour.

      Now you must be questioning me...yes, my hubs eats a *lot*. But I couldn't possibly let him eat two and a half pans of sticky buns. Could I? I mean, he could definitely put it away. But seriously...of course not. So what did I do with the other two pans of sticky buns, you ask? Well, I purposely prepared two disposable pans so I could freeze them. I love freezing meals. I just wish my freezer was bigger. Hmm. Anyway. One pan is for a family friend. The other is for consumption at a later date. A sweet Valentine's Day breakfast perhaps. I've never really had any problems with freezing dishes, so I can't imagine this won't work; however, I've never frozen anything with Splenda in it. I'll let you know if freezing them was a success or not.

      Happy [Belated] New Year everyone!!
      I hope your resolutions don't keep you from eating sweets -- remember: it's fine in moderation! ;)